Showing posts with label windows. Show all posts

Thursday, August 18, 2011

Skype 5.5 For Windows Unstable

Skype version 5.5 For Windows is Unstable. It is obvious the problem is with the new Visual Style.


To disable the Skype Visual Style:

Click Tools > Options

Change the Visual Style to 'Classic Windows'.


Save Changes.

Skype 5.5 For Windows Unstable

Monday, April 12, 2010

Convert any Video format to Xvid with Virtual Dub

Convert any Video format to Xvid with Virtual Dub

Uses:
Convert a DVD to avi
Backup a DVD
Xvid Encoding
Convert movies to Xvid
Compress a Video File

Requirements:

- Download and install the latest Xvid video codec
- Download and install the latest Virtual Dub

- DO THIS FIRST -
1) Open the video file in Virtual Dub. Enable the Fast Recompress in Video > Fast Recompress. Next, Click Video > Compression.


2) Select the Xvid codec at the bottom.


3) Select profile. Choose Unrestricted or choose a profile that best selects the target device you want to watch the Xvid video.
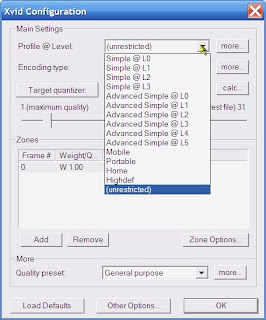


4) Hit F7 on the keyboard or go to File > Save as AVI and enter a filename.


5) Watch the newly created compressed Xvid Video!

or Batch Convert Videos

1) File > Queue Batch Operation > Batch Wizard
- Drag n Drop the Files into the Batch box
- Choose the destination folder
- Click Add to Queue - Re-Save as AVI

2) File > Job Control > Click Start

Sunday, December 27, 2009

Disable Google Updates, GoogleUpdate.exe

Disable Google Updates, GoogleUpdate.exe

Procedure To disable GoogleUpdate.exe from running automatically during startup

Click Run > Type Msconfig > Goto the Startup Tab

Remove the checkbox next to GoogleUpdate.exe

Click OK. Restart the computer.

GoogleUpdate.exe also adds itself to Scheduled Tasks.

Navigate to the Control Panel > Scheduled Tasks

Delete all the GoogleUpdate.exe entries.

Restart the computer.

Click Run > Click Browse > Navigate to c:\windows\system32\ > Select the services.msc file. Click open

Right Click on the Google Update Service > Properties

Set the Start Up type to Disabled

Repeat process for the Google Updater Service.

Restart Computer

Monday, September 03, 2007

Put Your Laptop SD Card Slot to Use, Create Backups

Backups are generally created on the following media:

- DVD/R
- External USB flash devices
- External USB HDD

A laptops SD card slot generally goes unused. Mounting an external USB flash device takes over a USB port and can break if you forget to unplug the device.


I've been experimenting in creating one click backups on a SD flash card, with great results! The greatest advantage is that you do not tie up a USB port and the SD card does not need to be ejected at all.

- Stick in a SD card
- Create a batch script that runs the backup either manually or invoked through a task/CRON schedule

The following script executes winrar with command line parameters and dumps the ZIP onto the SD card.

-- Begin Copy and Paste --

@ echo off
echo Kill a running app
taskkill /f /im APP_NAME_HERE.exe

echo cd into the winrar directory
c:
cd progra~1\winrar\

echo Run winrar
winrar a f:\ -r -afrar -m1 -rr -rv -t -ilog -ag+bck-MMM-DD_YYYY__NNN -x@F:\exclude-dirs.txt F:\SOURCE

echo Copy .ZIP to the SD Card, h:\ is the SD destination
copy /v f:\bck-*.rar h:\

pause

-- End Copy/Paste --

Dump the above contents into a .bat file and voila!

Requirements:

SD/MMC/MS Card - newegg.com
Winrar or Winzip
Laptop, duh!

Wednesday, July 18, 2007

RSM database is corrupt and cannot be Rebuilt

RSM database is corrupt and cannot be Rebuilt

Windows XP - If the Removable Storage service is disabled, the Computer Management applet will create an event log alert with the error:

"
RSM database is corrupt and cannot be rebuilt
"

To resolve this issue, set the Removable Storage startup type to Manual or Automatic(services.msc)

Alternatively, rebuild the RSM database by:

1. Stop the RSM Service
2. Delete the RSM databases located at %SystemRoot%\System32\NtmsData
3. Restart the RSM Service

Tuesday, July 17, 2007

Google, Unable to login - Certificate Expired Error

Google, Unable to login - Certificate Expired Error

Logging in to any of google's services will display a certificate expired error. This issue will occur if your computer clock is out of sync and displays an incorrect date/time.

Internet Explorer will display the certificate error and the post login process will stall. A temporary workaround to the problem is to enter the correct date/time through the windows date/time applet located in the systray. Attempt the login again after the date/time has been corrected.

Generally, a date/time error occurs due to a dead CMOS battery.

This issue affects all of google's services that require a google account- gmail, gtalk, google accounts, orkut etc.

Further reading:
Google Support - I received an error message that said to check my computer's clock settings

Friday, June 22, 2007

Is your computer running out of RAM?

Windows Users, Howto know if your computer is running out of RAM/Memory:

Open the Windows Task Manager (ctrl + alt + delete). Note the stats below the PF history. (screenshot)


From the screenshot above:

Total Physical Memory - This is the total amout of RAM/Physical memory installed in the computer. Total amount of RAM installed = 1.5GB

Commit Charge - The maximum amount of space used by the pagefile = 1.2GB

Total Physical Memory (K) = 1562668 ~1.5GB
Commit Charge Peak value (K) = 1340072 ~1.2GB

* Divide (K) by 1048576 to convert value to GB

Total Free RAM/Memory = Total Physical Memory - Commit Charge Peak value
= 1.5 - 1.2
= 0.3GB (~307MB)

In this example, 307MB is the total free memory available under load. This number is acceptable. I still have room to run a few more apps.

IF your total free memory is in the negative, Windows _will_ swap contents to the pagefile instead of the memory. This causes applications to slow down and Windows runs like a pig. Perhaps its time for that long awaited RAM upgrade. ;-)


Linux, check the amount of free RAM available:

Run the command free -m at the shell prompt:

-sh-3.00$ free -m
total used free shared buffers cached
Mem: 1010 794 215 0 14 205
-/+ buffers/cache: 575 435
Swap: 2000 257 1743

Thursday, May 24, 2007

PHP fopen Fails to Open Directory in Windows

fopen Fails to Open Directory in Windows

fopen — Opens file or URL


However, if the file is a directory, fopen will fail to open the directory in windows. This issue does not occur in Linux.

Windows Error:
Warning: fopen(c:\windows\): failed to open stream: Permission denied

Regardless of the permissions on the windows or any other directory, fopen will display the error.

PHP Code:

Windows:
$fh = fopen('c:\\windows\\', 'r');

Linux:
$fh = fopen('/home/test/', 'r');

fopen Fails to Open Directory in Windows

Monday, March 19, 2007

Reset the TCP/IP Stack

Reset the TCP/IP Stack

Windows XP - Is the TCP/IP config acting up? Enter the command in a DOS box and this will hopefully clear the mess!

Note: Write down or screen capture DNS addresses, LAN configs and other variables. The reset will wipe out all network settings.

netsh int ip reset c:\resetlog.txt

Tuesday, March 13, 2007

Disable Data Execution Prevention (DEP)

Disable Data Execution Prevention (DEP)

Edit the BOOT.INI file in the root of the partition from which the computer boots.

  • Right-click on My Computer and select Properties.
  • Click on the Advanced tab.
  • Click on the third button—settings for system start options.
  • Click on the Edit button to edit the boot.ini file.
  • Carefully edit the /NoExecute=OptIn string and change it to AlwaysOff. This part at the end of the line should now read: /NoExecute=AlwaysOff
  • Save and close the dialog boxes by clicking on OK.

Alternative Method:

  • ATTRIB -S -H -R C:\BOOT.INI
  • NOTEPAD BOOT.INI
  • Carefully edit the /NoExecute=OptIn string and change OptIn to AlwaysOff. This part at the end of the line should now read: /NoExecute=AlwaysOff
  • Close the editor and resave the BOOT.INI file back to where it was.
  • ATTRIB +S +H +R C:\BOOT.INI
To disable DEP by modifying the Boot.ini file, change the /noexecute policy level to alwaysoff.

/NoExecute=AlwaysOff

Monday, October 16, 2006

FTP Upload Files Through Windows DOS Prompt

FTP Upload Files Through Windows DOS Prompt

Listing a huge list of directories and files from a server in a FTP client can be time consuming. This solution involves uploading files directly through the Windows FTP program.

To upload files to the server without a FTP client, create the following two files in the d:\ftp directory:

upload-ftp.bat (copy and paste the contents below)

d:\
cd ftp
ftp -s:files.txt
(Note: d: is the drive where these two files are located)

files.txt (copy and paste the contents below)
open server-name.com
username
password
bin
prompt
cd /var/www/remotedir
send file1.zip
send file2.zip
send file3.zip
send file4.zip
quit

Double click to run the file upload-ftp.bat. The zip files to be uploaded need to be in the same directory (d:\ftp\ in this case) as the two files above.

Note: Ensure that the remote directory exists before uploading the files.